Written by Xander Veldeman
Foreword
Recently, one of our clients asked me if it would be possible to verify reCAPTCHA tokens using @IBM API Connect.
reCAPTCHA is a tool that verifies if a user is human. This verification happens in the front-end by the means of a button, through small tests such as “select the images with chimneys” or by scanning the page for unnatural movements of the cursor or focus.
To prevent tampering, we should check in the backend if this test was verified and if it was successful.
This piqued my interest because it could be added as a general extra security policy for all APIs which contact frontend applications.
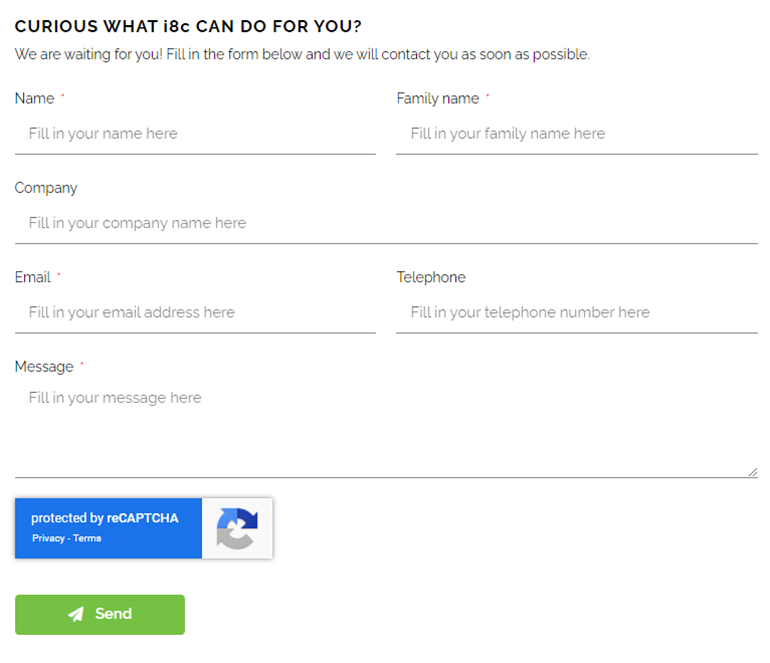
An example of a reCAPTCHA implementation: the i8c contact form.
The Ingredients
We will be using: – Google’s ReCAPTCHA v2 – IBM API Connect v2018 v5C / v10 5c – GatewayScript – Vue 3 (other frameworks can be used) – axios (others libraries can be used)
The Recipe
1. Setting up reCAPTCHA
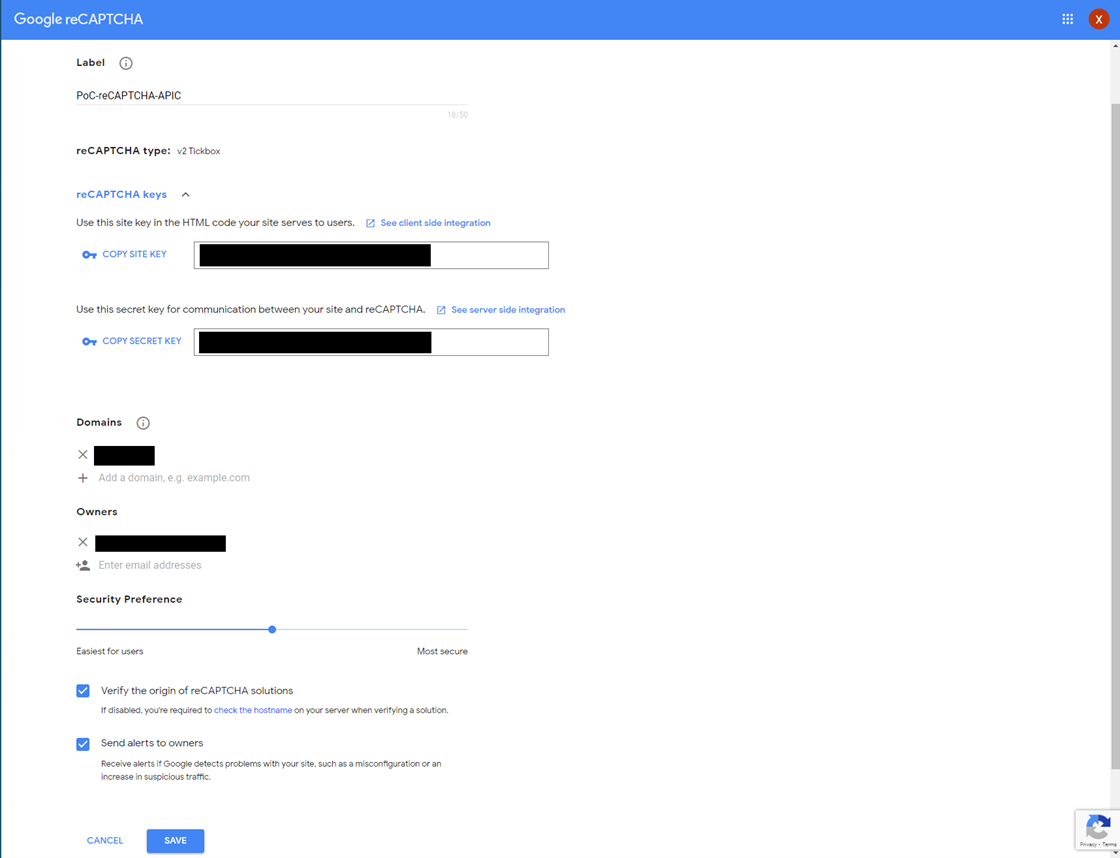
First things first, you will need to use your Google developer account to setup reCAPTCHA for your application. Select reCAPTCHA v2 and don’t forget to add your domain. After this you will get a keypair: a site key and a secret key, hold on to these as we will need them later.
2. The reCAPTCHA Widget
You want to be able to have your users complete the challenge. There are multiple ways of implementing the service to a frontend project. I picked Vue 3 for my front end, but still decided to not use an extra package that has the service built-in. This is mainly to showcase how to implement it on a lower level, but if you use a pre-made package you can probably skip some steps. Other packages you could use are: – Vue 2: vue-recaptcha – Angular: ng-recaptcha – React: react-google-recaptcha
To add the widget to our site you load in the script by adding it to the headers in index.html:
<code><script src="https://www.google.com/recaptcha/api.js" async defer></script></code>Code language: HTML, XML (xml)Go to the Vue component to which you want to add the widget and add an empty div with an Id. This so we can access it later.
<code><div id="g-recaptcha" class="recaptcha"></div></code>Code language: HTML, XML (xml)Next up you need to be able to load the widget. You can use the Vue3 onMounted lifecycle hook to load up the widget when we have access to the DOM. You read the reCAPTCHA library we loaded in earlier and map it to our empty element using its Id.
<code>onMounted(hook => {
  if (window.grecaptcha) {
    recaptchaId.value = grecaptcha.render(document.getElementById('g-recaptcha'), { sitekey: < ENTER CAPTCHA SITE KEY HERE > } );
  }
})</code>Code language: JavaScript (javascript)
This will load the reCAPTCHA widget box.
3. Sending the user response token for verification
The verification can be done by any party if they have the secret key and the response token. The check is a request back to the reCAPTCHA service to verify if the user completed the captcha successfully. This check can only be done once, afterwards the response token will become invalid.
To verify the response you add the token to the request:
<code>const sendRequest = () => {
  let recaptcha = "";

  if (window.grecaptcha) {
    recaptcha = grecaptcha.getResponse(recaptchaId.value);
  }

  // If recaptcha value is truthy
  if (recaptcha) {
    postWithCaptcha(recaptcha)
      .then((response) => {
        result.value = JSON.stringify(response, null, 2);
      })
      .catch((response) => {
        result.value = JSON.stringify(response, null, 2);
      });
  }
};</code>Code language: JavaScript (javascript)
The postWithCaptcha() function uses an axios post method and returns the Promise response. The configuration for axios is included in the method’s class:
<code>import axios from 'axios';

const instance = axios.create({
    baseURL: < APIC ENDPOINT URL >,
    timeout: 5000,
    headers: {'X-IBM-Client-Id': < IBM CLIENT ID >, 'X-IBM-Client-Secret': < IBM CLIENT SECRET >}
  });

export function postWithCaptcha(captchaHeader) {
  return instance.post('/validate-captcha',{}, {
    headers: {
      'X-ReCAPTCHA-Token': captchaHeader
    }
  });
}</code>Code language: JavaScript (javascript)
You don’t have to use axios, any HTTP pipeline API should work. It’s possible to use fetch or any other library/API.
4. APIC Preparations
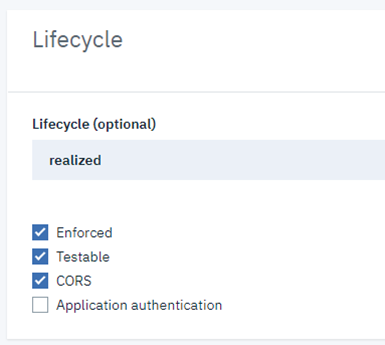
To safely send requests from our browser to APIC we need to set up CORS. This is trivial: just go to the design tab and under the Lifecycle options, select CORS. APIC will add the required headers to a CORS preflight OPTIONS request if the Origin isn’t ’*’. In v10 these options can be more finetuned.
To verify the user response token, we use a GatewayScript policy in the Assembly to send a request to the Google reCAPTCHA backend.
5. The GatewayScript
This is the policy that will validate the response token and add a failure or success header based on the response we get back from the reCAPTCHA service. It will also throw an error when the response is invalid.
5.1. Read the header
To read the header from the message, the v5c apim library can be used to access the assembly context:
<code>const recaptchaHeader = apim.getvariable('message.headers.X-ReCAPTCHA-Token');</code>Code language: HTML, XML (xml)Users of a native gateway should be using the context object to get or set the headers:
<code>const recaptchaHeader = context.message.header.get('message.headers.X-ReCAPTCHA-Token');</code>Code language: HTML, XML (xml)5.2 Create the request
If the header has been found, we can use the urlopen library for our communication to the reCAPTCHA verification service. First, we create a class containing the options used:
<code>let options = {
  target: `${recaptchaURL}?secret=${recaptchaKey}&response=${recaptchaHeader}`,
  method: 'post',
  sslClientProfile: 'api-ssl-recaptcha',
  timeout: 200
};</code>Code language: JavaScript (javascript)
The sslClientProfile is required for HTTPS communication. It’s the name of a TLS client profile given as a string value. It’s required for the validation of the server’s certificate.
Then, the connection is opened with the options object and an async function callback. The function is called when urlopen connects to the target and gives a response.
<code>urlopen.open(options, (error, response) => {
  if (!error) {
    if (response.statusCode === 200) {
      // READ DATA
    } else {
      // CHECK STATUS CODE AND HANDLE ERROR
    }
  } else {
    // HANDLE ERROR
  }
});</code>Code language: PHP (php)
The request we send to the reCAPTCHA service will look like this:
<code>POST /recaptcha/api/siteverify?secret=XXXX-SECRET-KEY&response=USER-RESPONSE-TOKEN HTTP/1.1
Host: www.google.com</code>Code language: HTML, XML (xml)
If everything checks out we should receive a response in the following format:
<code>HTTP/1.1 200 OK
Content-Type: application/json; charset=utf-8
Content-Encoding: gzip
Date: Fri, 08 Apr 2022 14:36:58 GMT
Expires: Fri, 08 Apr 2022 14:36:58 GMT
Cache-Control: private, max-age=0
X-Content-Type-Options: nosniff
X-Frame-Options: SAMEORIGIN
Content-Security-Policy: frame-ancestors 'self'
X-XSS-Protection: 1; mode=block
Server: GSE
Transfer-Encoding: chunked

{
  "success": true,
  "challenge_ts": "2022-04-22T12:36:55Z",
  "hostname": "localhost"
}</code>Code language: PHP (php)
If not, we will receive an error. Note that the response status code is still 200, but the body contains a success key that will be false.
<code>HTTP/1.1 200 OK
Content-Type: application/json; charset=utf-8
Content-Encoding: gzip
Date: Fri, 08 Apr 2022 14:36:58 GMT
Expires: Fri, 08 Apr 2022 14:36:58 GMT
Cache-Control: private, max-age=0
X-Content-Type-Options: nosniff
X-Frame-Options: SAMEORIGIN
Content-Security-Policy: frame-ancestors 'self'
X-XSS-Protection: 1; mode=block
Server: GSE
Transfer-Encoding: chunked

{
  "success": false,
  "error-codes": [
    "invalid-input-secret"
  ]
}</code>Code language: PHP (php)
5.3 Read the body
The response object represents the response of the network connection. One of the class’s methods is readAsJson(). It reads the data and parses it to JSON (NodeList) and if it cannot read the data, the error object will describe the error. If the data can be read, we can add it to the header and send it as our response.
<code>if (errorData) {
  if (responseData.success) {
    apim.setvariable('message.headers.X-ReCAPTCHA-Response', `ReCAPTCHA: SUCCESS - ${responseData.challenge_ts}`);
  } else {
    // handle error
  }
} else {
  // handle error
}</code>Code language: JavaScript (javascript)
The response will now contain a header with the “success” message and the timestamp of the validated captcha.
6 Result
The entire script should look something like this:
<code>// GET THE REQUIRED PROPERTIES/VARIABLES
const recaptchaHeader = apim.getvariable('message.headers.X-ReCAPTCHA-Token');
const recaptchaURL = 'https://www.google.com/recaptcha/api/siteverify';
const recaptchaKey = apim.getvariable('recaptcha-secret-key');
const urlopen = require('urlopen');

function throwRRCError(message) {
  apim.error('recaptcha-error', 401, 'Invalid Recaptcha', message);
}

// Check if the header exists and isn't null nor empty.
if (recaptchaHeader) {
  // CREATE OPTIONS FOR URLOPEN
  let options = {
    target: `${recaptchaURL}?secret=${recaptchaKey}&response=${recaptchaHeader}`,
    method: 'post',
    sslClientProfile: 'api-sslcli-all',
    timeout: 200
  };

  // OPEN URL
  urlopen.open(options, (error, response) => {
    if (!error) {
      if (response.statusCode === 200) {
        response.readAsJSON((errorData, responseData) => {
          if (!errorData) {
            if (responseData.success) {
              apim.setvariable('message.headers.X-ReCAPTCHA-Response', `ReCAPTCHA: SUCCESS - ${responseData.challenge_ts}`);
            } else {
              apim.setvariable('message.headers.X-ReCAPTCHA-Response', `ReCAPTCHA: FAIL`);
              throwRRCError('User response token denied.');
            }
          } else {
            apim.setvariable('message.headers.X-ReCAPTCHA-Response', 'Error: Could not read recaptcha body');
            throwRRCError('Could not read recaptcha body');
          }
        })
      } else {
        apim.setvariable('message.headers.X-ReCAPTCHA-Response', `Error: ReCAPTCHA Response is ${response.statusCode}: ${response.reasonPhrase}`);
        throwRRCError(`Error: ReCAPTCHA Response is ${response.statusCode}: ${response.reasonPhrase}`);
      }
    } else {
      apim.setvariable('message.headers.X-ReCAPTCHA-Response', `Error: ReCAPTCHA Could not connect`);
      throwRRCError('Could not connect to recaptcha service');

    }
  });
} else {
  apim.setvariable('message.headers.X-ReCAPTCHA-Response', 'Header not found');
  throwRRCError('X-ReCAPTCHA-Token header not found.');
}</code>Code language: JavaScript (javascript)
Conclusion
Now you have a GatewayScript Policy that can validate reCAPTCHA tokens. It’s still barebones, but it gives you a good head start. Some things that could be added are checks for the environment (automated testing shouldn’t work with reCAPTCHA validation), better error handling, clearer messages, etc…
I hope this article can help you in implementing an extra security layer for your APIs managed by API Connect.
IBM Integration Specialists
Enabling Digital Transformations.
Recent news
Let's get in touch...
 Find us here
Veldkant 33B
2550 Kontich
Belgium
Pedro de Medinalaan 81
1086XP Amsterdam
The Netherlands
![]() © 2019 Integration Designers - Privacy policy - Part of Cronos Group & integr8 consulting
© 2019 Integration Designers - Privacy policy - Part of Cronos Group & integr8 consulting